

When it comes to maintaining and improving your home's heating system, knowing how to change a radiator valve can be a valuable skill. Whether you need to replace a faulty valve or upgrade to a more energy-efficient model, this guide will take you through the process step-by-step. Plus, we'll show you how to change a radiator valve without draining the system, saving you time and effort.
Tools And Materials You'll Need To Change Radiator Valve
Before you begin, gather the following tools and materials:
- Adjustable wrench
- Pliers
- Radiator valve (matching the type and size of your existing valve)
- Pipe sealant tape
- Towels or rags (to catch any water spills)
- Bucket or container (for excess water)
Step 1: Preparation
To ensure a smooth process, it's essential to turn off the central heating system and allow the radiator to cool down completely. This will prevent any accidental burns or leaks.
Additionally, place towels or rags around the radiator to catch any water that may escape during the valve replacement.
Step 2: Removing The Old Valve
- Use an adjustable wrench to loosen the nut connecting the valve to the radiator. Rotate it counterclockwise until it's loose enough to remove by hand.
- Next, carefully unscrew the valve from the radiator, taking care not to damage the surrounding pipework.
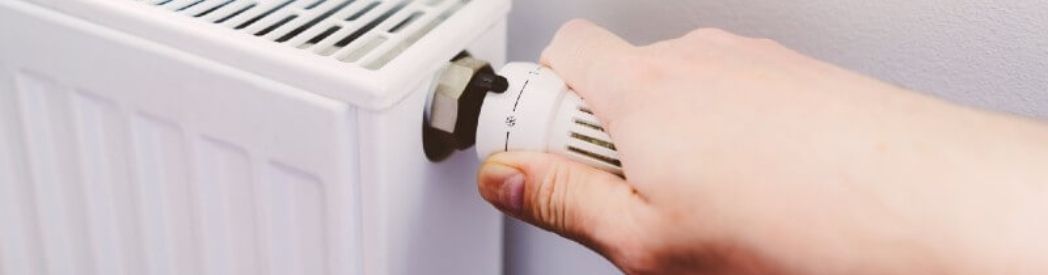
- If you're replacing a thermostatic radiator valve, be sure to disconnect the thermostatic head from the valve body before removing it.
Step 3: Fitting The New Valve
- Apply pipe sealant tape to the threads of the new valve. This will help create a watertight seal when fitting the valve onto the radiator.
- Screw the new valve onto the radiator by hand, ensuring it's securely fastened. Use an adjustable wrench to tighten it further if needed. Avoid over tightening to prevent damage to the valve or radiator.
- If you're installing a thermostatic radiator valve, reconnect the thermostatic head to the new valve body.
Step 4: Testing And Finishing
- Turn on the central heating system and check for any leaks around the new valve. If you notice any drips, tighten the valve slightly until the leak stops.
- Allow the radiator to heat up fully and check if the new valve is functioning correctly. Ensure that you can adjust the temperature and that the radiator heats up or cools down as expected.
- Once you're satisfied with the installation, clean up any remaining water spills and dispose of any used materials safely.
Changing a Radiator Valve Without Draining the System
If you prefer not to drain the entire heating system, you can use a pair of pliers to clamp off the pipe leading to the radiator you're working on. This will prevent water from flowing into that specific radiator while you change the valve. However, it's important to note that there may still be some water remaining in the radiator, so proceed with caution and have towels or rags ready to catch any spills.
Expert Tip: Changing a Radiator Valve with a Combi Boiler
If you have a combi boiler, it's crucial to ensure that the system is switched off before starting any work on the radiator valve. Combi boilers are pressurized, and attempting to change the valve while the system is running can cause leaks and other complications. Follow the steps outlined above, and always prioritize safety when working with your heating system.
By following this step-by-step guide, you can confidently change a radiator valve, whether it's a standard valve or a thermostatic one. Remember to gather the necessary tools, take precautions to avoid leaks, and test the new valve thoroughly before completing the process. With these skills, you'll be able to maintain your heating system efficiently and make necessary upgrades whenever needed.
Now that you're equipped with the knowledge of how to change a radiator valve, you can take charge of your home's heating system and keep it running smoothly for years to come.